CorDapp Database Setup-Production Perspective
January 08, 2020
This blog post shows you how to configure your node to connect to a Postgres database in production mode, instead of H2 which is used by default.
We saw how the node connects to a database in development mode in the previous post, by using admin access to gain full control over the database and automatically update it.
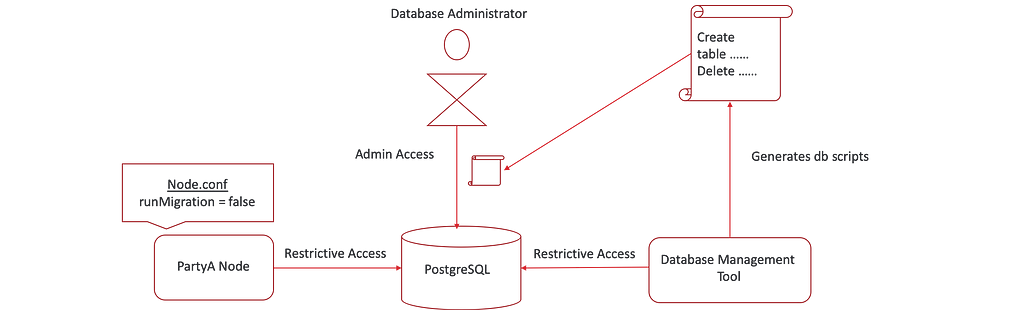
But from a production perspective, it’s different. We don’t want the node to automatically create the database schema. Hence the node is always connected to the database using restrictive access. We also set the runMigration flag to false, to prevent the node from performing any automatic schema updates.
But if the node does not apply the scripts to the database, who will?
This is where the database management tool comes into the picture, which is an essential tool used for a production-ready Corda deployment. A database admin would use this tool to generate database scripts by connecting the tool to the database using restrictive access. Once the scripts are generated, the database administrator should inspect them and apply them manually onto the database using his tool of choice.
In this post, we will look at how to set up a PostgreSQL database for an IOU application. To do this, we will start a PostgreSQL container using docker and PSQL to connect to the database.
Prerequisites
- We will use the IOU application from the sample directory. We will configure 3 nodes — Notary, PartyA, PartyB. The Notary will connect to a H2 database (by default), hence no explicit database configuration is required. PartyA and PartyB will connect to the PostgreSQL database, which will require executing the steps below.
- The latest version of PostgreSQL and JDBC PostgreSQL driver can be used. PostgreSQL 9.6 is the lowest acceptable version. For this demo, I used PostgreSQL 11 and docker to quickly create a database.
Broadly you have to perform 4 steps to connect to PostgreSQL.
- Creating a database user with restrictive schema permissions.
- Database schema creation with Corda Database Management Tool.
- Node Configuration (runMigration = false).
- Start the node.
Step 1 : Creating a database user with schema permissions, start docker
1. Create file party_a.sql for PartyA node containing scripts to create a user, schema, and assign restrictive access for this schema to user party_a. PartyA node will connect to the database using user party_a.
CREATE USER "party_a" WITH LOGIN PASSWORD 'my_password';
CREATE SCHEMA "party_a_schema"
GRANT USAGE ON SCHEMA "party_a_schema" TO "party_a";
GRANT SELECT, INSERT, UPDATE, DELETE, REFERENCES ON ALL tables IN SCHEMA "party_a_schema" TO "party_a";
ALTER DEFAULT privileges IN SCHEMA "party_a_schema" GRANT SELECT, INSERT, UPDATE, DELETE, REFERENCES ON tables TO "party_a";
GRANT USAGE, SELECT ON ALL sequences IN SCHEMA "party_a_schema" TO "party_a";
ALTER DEFAULT privileges IN SCHEMA "party_a_schema" GRANT USAGE, SELECT ON sequences TO "party_a";
ALTER ROLE "party_a" SET search_path = "party_a_schema";
2. The same should be done for PartyB, below is what that configuration would look like.
CREATE USER "party_b" WITH LOGIN PASSWORD 'my_password';
CREATE SCHEMA "party_b_schema"
GRANT USAGE ON SCHEMA "party_b_schema" TO "party_b";
GRANT SELECT, INSERT, UPDATE, DELETE, REFERENCES ON ALL tables IN SCHEMA "party_b_schema" TO "party_b";
ALTER DEFAULT privileges IN SCHEMA "party_b_schema" GRANT SELECT, INSERT, UPDATE, DELETE, REFERENCES ON tables TO "party_b";
GRANT USAGE, SELECT ON ALL sequences IN SCHEMA "party_b_schema" TO "party_b";
ALTER DEFAULT privileges IN SCHEMA "party_b_schema" GRANT USAGE, SELECT ON sequences TO "party_b";
ALTER ROLE "party_b" SET search_path = "party_b_schema";
This page on the documentation talks more about writing scripts for Azure, Oracle, and SQL Server as well.
3. Start the docker container by running the below command.
docker run --name postgres_for_corda -e POSTGRES_PASSWORD=my_password -d -p 5432:5432 postgres:11
4. Connect to the database using admin access and execute above created scripts to create users, schemas and assign permissions.
cat party_a.sql | docker exec -i postgres_for_corda psql -h localhost -p 5432 -U postgres
cat party_b.sql | docker exec -i postgres_for_corda psql -h localhost -p 5432 -U postgres
Step 2: Database schema creation with Corda Database Management Tool
Corda uses Liquibase for database schema versioning. This makes the Corda database agnostic. Liquibase supports writing DDL/DML statements in many formats (XML, JSON, SQL, YAML). When the node starts, these database-agnostic scripts convert to database-specific scripts.
Connect the database management tool to the database and run the dry-run command to generate the database scripts. The database management tool internally uses Liquibase to convert generic scripts to database-specific scripts.
2.1 Create Liquibase required tables
- Liquibase internally uses a databasechangelog table to maintain a list of changesets (each changeset is a list of DDL/DML queries) that have executed onto the database to date.
- When we do a fresh installation, the database admin must manually run the following script to generate these tables. Create a file named databasechangelog.sql and copy the below script to this file.
CREATE TABLE "party_a_schema".databasechangelog (
  id varchar(255) NOT NULL,
  author varchar(255) NOT NULL,
  filename varchar(255) NOT NULL,
  dateexecuted timestamp NOT NULL,
  orderexecuted int4 NOT NULL,
  exectype varchar(10) NOT NULL,
  md5sum varchar(35) NULL,
  description varchar(255) NULL,
  comments varchar(255) NULL,
  tag varchar(255) NULL,
  liquibase varchar(20) NULL,
  contexts varchar(255) NULL,
  labels varchar(255) NULL,
  deployment_id varchar(10) NULL
);

CREATE TABLE "party_a_schema".databasechangeloglock (
  id int4 NOT NULL,
  locked bool NOT NULL,
  lockgranted timestamp NULL,
  lockedby varchar(255) NULL,
  CONSTRAINT pk_databasechangeloglock PRIMARY KEY (id)
);
3. Execute the above script by running the below command
cat databasechangelog.sql | docker exec -i postgres_for_corda psql -h localhost -p 5432 -U postgres
2.2 Configure the Database Management Tool
- Create a new folder named db_admin and create individual folders for all the nodes. Add node.conf, PostgreSQL JDBC driver, and CorDapp jar to each node.
- db_admin/PartyA/node.conf
dataSourceProperties {
    dataSource {
        password="my_password"
        url="jdbc:postgresql://localhost:5432/postgres"
        user="party_a"
    }
    dataSourceClassName="org.postgresql.ds.PGSimpleDataSource"
}
database {
    transactionIsolationLevel=READ_COMMITTED
    schema="party_a_schema"
    runMigration=false
}
# When JDBC driver is not placed into node's 'drivers' directory then add absolute path:
# jarDirs = ['absolute_path_to_directory_with_jdbc_driver']

myLegalName="O=PartyA,L=Delhi,C=IN"
3. db_admin/PartyA/cordapps- add CorDapp.jar to this directory
4. db_admin/PartyA/drivers- add jdbc PostgreSQL driver to this directory.
5. database-management-tool.jar version should be the same as the Corda version which you are using.
2.3 Extract the DDL script using Database Management Tool
Run the dry-run command to generate PostgreSQL specific scripts.
java -jar tools-database-manager-4.1.jar dry-run -b db_admin/PartyA
2.4 Apply DDL scripts on a database
- The database administrator should manually check the above-generated script, connect to the database, and run the script manually using their tool of choice.
- This is the only step when the database administrator connects to the database using admin access.
2.5 Update the database (Ignore this step for a fresh installation. Not used for a fresh installation. Required for node upgrade)
There are times when you want to modify your existing data, and you are not able to express this via an SQL script. Liquibase lets you define and execute custom Java/Kotlin logic for such a scenario using a custom change changeset.
As an example, take a look at vault-schema.changelog-v9.xml file. This defines a custom changeset which takes care of populating values of relevancy_status column. This changeset calls the code written in VaultStateMigration, which assigns value 0 or 1 to relevancy_status column depending on whether the column is relevant to the node or not.
/* vault-schema.changelog-v9.xml file. This liquibase script defines a custom changeset */
<databaseChangeLog xmlns="http://www.liquibase.org/xml/ns/dbchangelog"
                   xmlns:xsi="http://www.w3.org/2001/XMLSchema-instance"
                   xsi:schemaLocation="http://www.liquibase.org/xml/ns/dbchangelog http://www.liquibase.org/xml/ns/dbchangelog/dbchangelog-3.5.xsd">

    <changeSet author="R3.Corda" id="update-vault-states">
        <customChange class="net.corda.node.migration.VaultStateMigration"/>
    </changeSet>
</databaseChangeLog>
Run the execute-migration command of the database management tool to populate such values.
java -jar tools-database-manager-4.1.jar execute-migration -b .
Step 3: Node Configuration
1. Create party_a_database.conf for PartyA specifying the database connection properties to connect to the database.
dataSourceProperties {
    dataSource {
        password="my_password"
        url="jdbc:postgresql://localhost:5432/postgres"
        user="party_a"
    }
    dataSourceClassName="org.postgresql.ds.PGSimpleDataSource"
}
database {
   transactionIsolationLevel=READ_COMMITTED
   schema="party_a_schema"
   runMigration=false
}
# When JDBC driver is not present into the node's 'drivers' directory then add absolute path:
# jarDirs = ['absolute_path_to_directory_with_jdbc_driver']
2. The same should be done for PartyB, below is what that configuration would look like.
dataSourceProperties {
    dataSource {
        password="my_password"
        url="jdbc:postgresql://localhost:5432/postgres"
        user="party_b"
    }
    dataSourceClassName="org.postgresql.ds.PGSimpleDataSource"
}
database {
   transactionIsolationLevel=READ_COMMITTED
   schema="party_b_schema"
   runMigration=false
}
# When JDBC driver is not placed into node's 'drivers' directory then add absolute path:
# jarDirs = ['absolute_path_to_directory_with_jdbc_driver']
Since this is production mode, we are setting runMigration to false.
3. Copy PostgreSQL JDBC driver to node’s driver directory. You could add the driver to the node’s driver directory or specify the driver’s absolute path in jarDirs property in node.conf.
cp postgresql-42.1.4.jar nodes/PartyA/drivers/
cp postgresql-42.1.4.jar nodes/PartyB/drivers/
4. Deploy the IOU CorDapp and run below command to update each node’s node.conf. This appends the database connection properties to node.conf.
cat party_a_database.conf >> nodes/PartyA/node.conf
cat party_b_database.conf >> nodes/PartyB/node.conf
Step 4: Run the node
1. The node connects to the database using restrictive access. By now, the database administrator must have created all the required tables by the node. If there are any pending changesets that the database admin has not applied to the database, the node doesn’t start and complains saying the node is behind by x number of changesets.
./runnodes
2. Verify if the tables are created using
docker exec -i postgres_for_corda psql -U postgres -p 5432 -h localhost postgres -c "select * from party_a_schema.*"
Node Upgrade
If you want to perform node upgrade from version x to y follow below steps.
- Stop the node.
- Replace corda.jar with the new version.
- Run the dry-run command of database-management-tool to generate the database scripts containing schema changes in the new jar. The tool connects to the database, uses Liquibase to detect the new schemas by looking at the databasechangelog table, and generates the script.
- Database admin applies this script manually onto the database.
- Update the database by running above mentioned Step 2.5. Execute this step, if mentioned in the release notes.
- Start the node. The node should connect to the database as all the required scripts were already manually applied to the database.
Points to Note:
- Each Corda release has release notes stating if there are any schema changes. If there is, then no need to run the database management tool.
Some useful docker commands to use
Some useful docker commands to use
CREATE DATABASECHANGELOG
docker exec -i postgres_for_corda psql -U postgres -p 5432 -h localhost postgres -c “CREATE TABLE “party_a_schema”.databasechangelog (ID VARCHAR(255) NOT NULL, AUTHOR VARCHAR(255) NOT NULL, FILENAME VARCHAR(255) NOT NULL, DATEEXECUTED TIMESTAMP WITHOUT TIME ZONE NOT NULL, ORDEREXECUTED INT NOT NULL, EXECTYPE VARCHAR(10) NOT NULL, MD5SUM VARCHAR(35), DESCRIPTION VARCHAR(255), COMMENTS VARCHAR(255), TAG VARCHAR(255), LIQUIBASE VARCHAR(20), CONTEXTS VARCHAR(255), LABELS VARCHAR(255), DEPLOYMENT_ID VARCHAR(10))”
CREATE DATABASECHANGELOGLOCK
docker exec -i postgres_for_corda psql -U postgres -p 5432 -h localhost postgres -c “CREATE TABLE “party_a_schema”.databasechangeloglock (ID INT NOT NULL, LOCKED BOOLEAN NOT NULL, LOCKGRANTED TIMESTAMP WITHOUT TIME ZONE, LOCKEDBY VARCHAR(255), CONSTRAINT PK_DATABASECHANGELOGLOCK PRIMARY KEY (ID))”
Thanks to Szymon Sztuka and The Corda Team
Thanks for reading — Sneha Damle, Developer Evangelist (R3).
CorDapp Database Setup-Production Perspective was originally published in Corda on Medium, where people are continuing the conversation by highlighting and responding to this story.